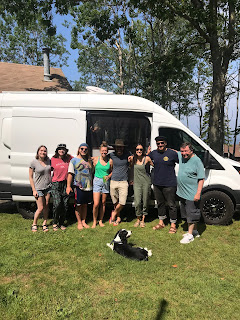
Introducing: Fran the Van
We've settled on our name for our van!! We named her after Frances Inez Whitman, Zach's late Grandmother. Zach was her first grandchild and, as he remembers it, her favorite ;) She was also Jay's mother and Jay had a lot to do with making our van build so successful, so we felt the name was fitting.


We're excited to finally show a full tour of the van, our tiny home for the next year and a half!
Van Specs
- 2018 Ford Transit 250 - fits in a regular size parking spot!
- Purchased with 34k miles - we'll be adding about 30k miles on this trip :)
- High Roof - 6'5" clearance on the inside, enough to stand very comfortably!
Exterior Modifications
As far as actual modifications to the body of the van goes, we added a T-Vent window in the kitchen area of the van to allow for ventilation and help with airflow. This type of window can be opened even in the rain (which has been a life saver this past week!)
To the rear sides of the van, we added flares from a company called Flarespace in order to widen the back a total of 7". Will discuss more on this in the sleeping arrangements section.
And finally, on the roof we added a MaxxAir fan to circulate the air by pulling air out or pushing air in- depending on the weather we're in.
 |
| Full view of Fran. You can see the MaxxAir fan on the top of the roof & the flare slightly popped out on the rear. |
 |
| Inside view of the fan. |
 |
| From this angle, you can see one of the solar panels located on the roof. |
Insulation
Insulation was something that was super important to us. Having a pup on this adventure with us, we know there are going to be times where we have to leave him in the van. Whether this be while we're grocery shopping or just going somewhere where he won't be able to come with, we wanted to make sure we could control the temperature as much as possible so he'd be comfortable. Adding all the fans and window covers in the world won't help keep a giant metal box temperate if that giant metal box isn't also insulated itself.
We opted to go with spray foam insulation and hired a company that typically spray foams homes. This material is a bit more expensive but the R-value is so much greater with it.
We also made window covers with reflectix that cover the windows, in addition to having insulated blackout curtains in the rear of the van.
Sleeping Arrangements
So, prior to embarking on this journey, we spent a REALLY unhealthy amount of time watching van build videos on YouTube. And our favorite layouts were always the ones that had a couch that doubled as a bed. It just created so much more living space and really seemed the most functional. However, we knew we weren't the kind of people who would enjoy converting a couch into a bed and then back again every single day for a year and a half. So we opted for a layout that allowed the bed to be stationary all of the time.
By installing the flares we mentioned above, we were able to put the bed sideways versus long ways which save us 2 feet of living space in front of the bed. We were able to fit a full size 8" memory foam mattress and have PLENTY of room to stretch out from head to toe!
 |
| You can see the inside view of the flare at the head of our bed. |
 |
| Foot of the bed flare. |
 |
| Full view of the bed. |
Dining Space
Because we were able to save that extra 2 feet in front of the bed by placing it sideways, we were able to fit in bench seats in front of the bed that face each other. They also double as additional storage and underneath the bed there was space to put a slide out table that can be easily pulled out and put away as needed.
 |
| Sitting at our dining table. |
Pup Space
From all the research we did, some of the biggest takeaways were about traveling with a dog. Everyone said the same thing: make sure you plan space for your dog too- they need somewhere to walk, sleep, eat, etc. So we did just that!
Underneath our pull out table, we created a space for Miles to sleep. He was crate trained as a puppy and has always been comfortable in confined spaces - so we naturally felt like creating a "crate" for him would be the best thing for Miles. He's slept in it every night and even enjoys it while we're driving!
 |
| Conversations with Miles. |
 |
| Miles' space in between the bench seats. |
Electrical System
This by far was the most complicated part of the build. Based on our needs and our expected amp hour usage/day, we settled on:
- 300 watts of Solar Panels on the roof
- 200ah AGM battery - this sucker is 130lbs!! We placed this over one of the wheel wells for weight distribution purposes, see Water System for what we did with the other wheel well.
- 2000 watt pure sine inverter
- Sterling Battery-to-battery charger
- 6 12v LED puck lights
- 3 120V AC power outlets with USB inputs
- Charge controller
- Battery monitor
So far, so good! But I will say that the Battery to Battery charger is worth its weight in gold. Our first week on the road was spent in very overcast weather and though our Solar would get us to full charge, it wouldn't charge as quickly with all the cloud cover. Because we drove every single day, the battery to battery charger would make up for the weather by charging our "house" battery from our "car" battery while we drove!
Also, our battery monitor has also been great. It lets us know things like what our battery levels are, what the input and output are, and how long we can sustain with the current usage. And they are all in an app, on our phones so we can easily access and monitor them.
 |
| Our electric hub in the "garage" on the driver side. |
Water System
Our water system is pretty simple. We have a 21 gallon fresh water tank that is stored over the passenger wheel well to balance out the weight from the battery on the driver side. From there we have a Shurflo water pump that pumps water to our kitchen sink and also to our outdoor shower that we've mounted in the back - hello, hot water!
The water that drains from the kitchen sink empties into a 5 gallon grey water tank we have stored under the sink.
Fill up stations are pretty easy to find in the states - most gas stations have free water or when we are at campgrounds, we'll use the potable water there.
Though most of the water we'll get in the states & Canada will be completely fine to drink, we are still using a carbon filter that helps to remove metals and bacteria as an extra layer of protection. When we get down to Mexico and beyond, we will only be filling our fresh water tank with fully filtered water that we purchase from safe water sources.
 |
| Our water tank nestled back on the passenger side in the "garage" |
 |
| The shower is located just below the bed on the passenger side. |
 |
| Underneath the sink you can *sorta* see the blue water tank- our gray water tank. |
Kitchen
As far as kitchen appliances go, we have 3 sources to cook: our InstantPot, a single burner induction cooktop, and a 2 burner propane camp stove. We knew we didn't want to have a larger tank of propane always hooked up to a stove for fear of leaks, so we only use our propane camp stove if we want to cook outside or in the case where we need to save battery power. Induction cooktops are power hogs, ya'll!! But they are also extremely quick to get to temperature, so it's a trade off.
And while I'm talking about cooking - OMG these Magma nesting pots are proving to be one of the best investments we've made so far. Who knew that the first NICE set of pots and pans I'd purchase for myself would be for our camper van....but they are SO easy to clean, they work on both of our stove tops, nest completely inside each other so they don't take up too much space, and are just really great quality. HIGHLY recommend!
We also have a Kitchen-aid blender to make smoothies, soups, sauces, etc. And of course, our Dometic 50L DC refrigerator. Everything gets stored in our large kitchen cabinet - thanks again, Papa Clay!!
On the sink side, we have our sink cut out that can either rest inside the sink for extra counter space or be pulled out. Underneath the sink is where our gray water tank is stored as well as our trash can, fire extinguisher, towels, etc.
 |
| Top view of our kitchen cabinet with our bottom two drawers pulled out: InstantPot and blender on the left, refrigerator on the right. |
 |
| Sink with cut out slightly pulled out. |
Storage
We have SO much storage in the living area of the van. We have 5 gorgeous upper cabinets (courtesy of Papa Clay) in addition to our bench seats and kitchen cabinets. We store all of our clothes in the cabinets, toiletries, electronics, extra towels and blankets, and all of our dry food. I'm really amazed at the amount of things we are able to store... now just need to get used to the placement so we stop bumping our heads hahah. Each of the upper cabinets are supported with a piston hinge to keep them open while we are getting things in and out of them which is really convenient!


 |
| Our bookshelf doesn't have a door and is kept open :) |
Garage
The garage stores all of our bulky items or things we don't need to get to daily: camping and backpacking gear, camp chairs, our winter clothes, plumbing stuff, tools, yoga mat, etc. We have a bunch of different stackable clear plastic bins and we've found that it's really easy to determine what's inside, move things around, and store things efficiently.
 |
| You can see all of our "garage" storage under the back. |
Pee Funnel
Our FAVORITE functional aspect of the van! We opted to not have a toilet in the van. Though compostable toilets are common and work for a ton of people, you couldn't pay me all the money in the world to empty the urine or poop containers. We determined that for #2's we'd just have to take advantage of bathrooms when we could or be OK with digging holes when we couldn't. But for peeing- I pee in the middle of the night, every single night. There was no way I'd feel comfortable holding it or going outside if we were parked in a populated area overnight.
We got the idea of the pee funnel from other Van Lifers and decided it was easy enough to install and went for it. We drilled a hole into the bottom of the van and pushed a tube from inside the bottom of the sink cabinet through to the bottom of the van. Add some vinyl tubing and a funnel from O'Reilly's and voila! Huge success so far and something we couldn't live without :)


Comments
Post a Comment